

Download User Guides
Sylphyo User Guide
1 The Sylphyo at a glance
Sylphyo is an electronic wind instrument that reproduces the feeling of an acoustic wind instrument. Like them, it is played by blowing into a mouthpiece and selecting notes using keys on the front of the instrument. However, unlike other wind instruments, the Sylphyo is also sensitive to your movements, as well as the way you touch it, offering novel expressive possibilities.
To be able to hear the sound of your Sylphyo, plug it to your headphones, amp, or any other sound system. Your Sylphyo also allows you to control any hardware synthesizer or virtual instrument on your computer1.
Your Sylphyo becomes wireless when paired to a Link receiver, which you might have already bought. This means that instead of connecting the Sylphyo directly to your sound system, computer, or synthesizer, you can connect the Link receiver instead, and use your Sylphyo freely without being bothered with cables.
Of course, nothing prevents you from using it both wired and wireless. For instance, you could use the headphones output of the Sylphyo as an in-ear monitor on stage while the Link is connected to the control booth.
1.1 Overview

1.2 What’s in the box?

Two accessories2 are included along with your Sylphyo:
 | 5W chargerPlug the 5W charger into a mains socket in order to charge the battery of the Sylphyo using the USB cable. |
 | USB cableUse the USB cable to connect the receiver device to your computer. |
You might also have bought a Link wireless receiver to turn your Sylphyo into a wireless instrument. You can use the charger and USB cable to power your Link receiver, or to connect it to a computer. For more information about the Link receiver, please see the dedicated section.
1.3 First steps
When you unbox your Sylphyo, its battery might not be fully charged. Before turning it on for the first time, make sure you charge it for up to 8 hours. This ensures that the battery is not in deep discharge mode, which could prevent the instrument from functioning correctly.

Once the battery is fully charged, you can begin using your Sylphyo. Connect your headphones into the headphone output near the bell, and turn on your Sylphyo using the power-on switch just next to the headphone output.
Important

Then, follow the instructions that appear on the display.


Make sure your finger stays in contact with it until you see the main screen.


In the next section, you’ll learn how to play different notes and change the timbre of your sound. But before that, let’s get to know your Sylphyo a bit better.
1.4 What is there to see?
The display of your Sylphyo provides you with three main screens that provide you with all the relevant information to perform and configure it according to your needs.
1.4.1 Performance screen
1.4.2 Quick settings

1.4.3 Settings menu

1.5 What is there to touch?
The following explains the different keys and touchable elements you can interact with.

- The Aodyo key (Aodyo) allows you to enter Quick settings, which you enter as soon as the key is pressed, and leave as soon as it is released.
You can also access the Settings menu by holding Aodyo while sliding your thumb over the slider from bottom to top.
Inside the Settings menu, pressing Aodyo always allows you to go back to the previous screen. - Note keys allow you to select the played note. The default fingerings are similar to a modern recorder, however they can be changed in the Settings menu.
- Each octave key acts like a recorder thumb hole, or like a saxophone octave key, but at different octaves (◆ is the base octave, ↑ goes up by 1 octave, and ↓ goes down by 1 octave).
In Quick settings (when you keep pressing the Aodyo key), octave keys allow you to select a quick setting.
In the Settings menu, you can select a menu item using ↑ and ↓, and confirm using ◆. - Settings keys allow you to increase (+) or decrease (-) some parameters in the Quick settings and the Settings menu.
During your performance, they act as supplementary octave keys, going down by two (+) or three (-) octaves. - The slider allows you to nuance the played sound by sliding your thumb vertically.
It also allows you to access the Settings menu by sliding from the very bottom to the top while pressing the Aodyo key.
In the Settings menu, you can also use the slider to select and confirm menu items (by sliding and tapping, resp.), and you can go to the previous screen by sliding your thumb from the very top to the bottom.
1.6 What is it, exactly?
Your Sylphyo is a musical instrument: it is a tool that turns your gestures into sounds. Once you learn how to play it, it becomes an extension of your mouth and hands, allowing you to convey emotions and intentions in a musical form, respecting most nuances you put into playing.
Your Sylphyo can also be a controller: when it processes input from its various sensors (breath, inertial, capacitive…), it determines what you are doing, and then can send orders (e.g., start playing a soft C note) to a software or hardware synthesizer that processes these orders and produces sounds. These orders are formatted as messages in the MIDI communication protocol, an industry standard for more than 30 years. Most synths understand MIDI, so you can really control almost anything that produces sound using the Sylphyo.
With the Link receiver, your Sylphyo is also wireless: what the Sylphyo interprets from your gestures is continuously transmitted from the Sylphyo to the Link receiver through radio waves (typically in less than a millisecond), and the Link receiver turns that into sound and into MIDI messages, that it then passes on to your computer, smartphone, tablet, or hardware synth, which then produces sound. When using internal sounds, the whole process does not take more than a few milliseconds, and when using MIDI it should take between 5 and 20 milliseconds (gesture-to-sound), depending on the computer, device, or synth at the receiving end.
Finally, your Sylphyo is future-proof: it is designed so that you can benefit from further software and hardware improvements3. Updates to the internal software are free, designed for all existing Sylphyo units, and you can download them on our website. In the future, you will also be able to buy an active mouthpiece with extra sensors for even more expressiveness.
2 Playing the Sylphyo
Like any wind instrument, your Sylphyo is played by blowing air into its mouthpiece. Your breath then flows through the body of the instrument, which produces sound as a result. Although the Sylphyo has a very different way of making sound compared to acoustic instruments, it has been designed to be played just like one.
If you are familiar with wind instruments, feel free to skip the first few subsections.
Before you start playing for the first time
- your Sylphyo is fully charged (leave it charging up to 8 hours the first time),
- your headphones are connected to the headphones output of the Sylphyo near the bell,
- your Sylphyo is powered on (using the power-on switch near the bell).
2.1 Playing position
Grab your Sylphyo with your left hand, and put your right thumb below the thumbrest. Then, place the fingers of your left hand on the four topmost note keys, and place the fingers of your right hand on the remaining four bottom keys. In the base playing position, your left thumb should touch the middle octave key.

Note

2.2 Breath control
Now, place the mouthpiece between your lips, and gently blow into it. You should hear a sound coming out of your headphones. Don’t worry if you don’t really like what you hear, because your Sylphyo can play several different sounds, and you’ll soon learn how to play them.
When you blow more air, the sound intensifies, and when you blow more lightly, its intensity decreases. When you stop blowing, the sound stops.
Take a moment to appreciate the relationship between how hard you blow and how intense the sound is. You should notice that the way you breathe has an impact on the timbre of the instrument: loud notes seem brighter, and soft notes seem darker.
Note
Even if the sound sometimes seems to linger or reverberate for a bit after you stop blowing, your breath is its fuel: it provides it with energy, makes it exist, and keeps it going. Using your breath, you can shape a note a bit like you would brush a stroke on a canvas: during your gesture, you determine exactly how and where you want to apply your ink to the painting4. There are many ways to shape a note. Let’s try some of them:
 | Short and longTry several note durations, from really short notes to really long ones. |
 | Soft and loudTry to make a soft note, then a really soft one, and finally a really loud one that becomes a little more muted at the end. |
 | Crescendo and descrescendoStart by making a really soft note, then increase its intensity in a very gradual way. Stay at the loudest for a moment, then make it softer and softer until it vanishes. |
 | TremoloTry maintaining a note for a second, then use your throat to softly oscillate the amount of air. |
 | StaccatoHave you paid attention at how you use your throat and tongue when playing a note? Some people naturally do fuu, while others do tuu, duu or kuu, but all have a different effect on your sound. Try them all to see how they more or less detach each note from the other. |
 | Flutter-tonguingRolling the “R”s, or flutter-tonguing, has a dramatic effect on the sound, but should be used sparingly. |

Note
Now that you can shape notes and create rhythm, let’s focus on how you can apply melody.
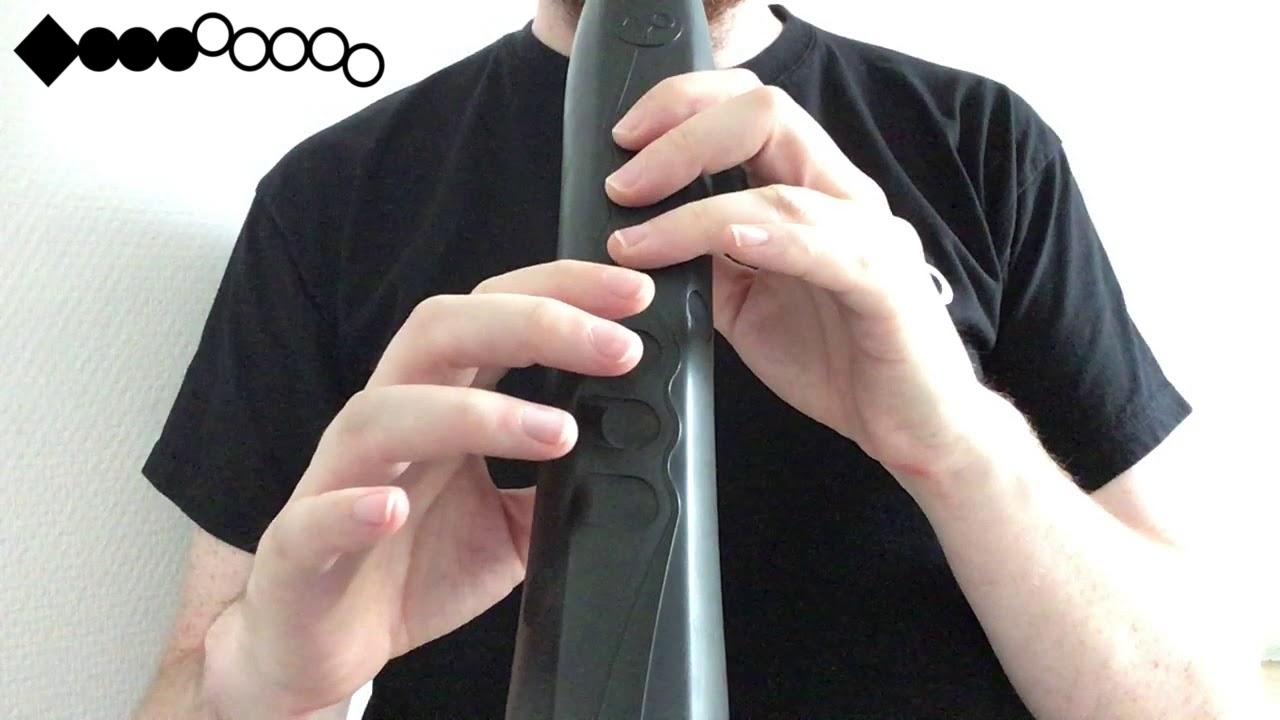
2.3 Fingerings
When you are in the playing position, each of your fingers is assigned to a specific note key, and your left thumb touches any of the five octave keys above the thumbrest.

First, touch all the note keys in the front except the one under your left little finger. Also touch the middle octave key on the back of your Sylphyo using your left thumb.
To represent this particular fingering, we’ll use the notation XxxxOxxxX (or XxxxOxxxX in textual form).
If you blow into the mouthpiece, you will hear a C note on the third octave (C3).
Then, raise your right little finger (XxxxOxxxO), and blow into the mouthpiece again: you now hear a D3.
Continue raising your fingers one by one, from bottom to top, blowing into the mouthpiece each time so as to hear the notes you play. When only your left index finger remains in the front of the Sylphyo (XxooOoooO), you are playing a B3.
Finally, raise your left index and touch the left middle finger key (XoxoOoooO), then blow into the mouthpiece: you just ended the C major scale with a C4 (C note on the fourth octave).
The fingerings are very close to the modern recorder, and if you are familiar with it you will quickly be able to play any note in the chromatic scale. There is one addition though: the left little finger key raises any note by a semitone (for example, C3 will become Db3).
Note
To change the fingering, check out the section of the Settings menu.
One of the later sections of this guide describes all the available fingering modes.
2.4 Shake vibrato
To emphasize specific notes in your melody, you might want to apply vibrato while playing. Vibrato is a common performance technique where the played pitch slightly varies in a periodic fashion, introducing a feeling of movement and expression.

To make a vibrato, repeatedly and slightly shake your Sylphyo away from and towards your mouth while playing a note.

Usually, electronic instruments only allow you to control vibrato at a fixed rate or intensity, but with shake vibrato you can control all aspects of your vibrato. Just vary the speed at which you shake the instrument.
2.5 Inertial mode
Using inertial mode, you can also make music without blowing into it, just by moving your Sylphyo around.
 | Shake to moveActivate the inertial mode by gently, but firmly shaking your Sylphyo from top to bottom (shake-to-move), while maintaining contact with the slider using your thumb. You should see a white line with the caption INERTIAL MODE on the bottom edge of the performance screen. |
 | Tilt for slow variationsNow, slowly tilt your Sylphyo from the vertical to the horizontal position. You should start hearing sound at a 45° angle, and it should reach its maximum intensity when the Sylphyo is horizontal. In inertial mode, the elevation angle of your Sylphyo (how you tilt it) always replaces the intensity of your breath in the control of sounds. |
| Shake for fast attacksTilting is fine for slow variations, but you can also produce fast attacks using the same gesture that activates inertial mode: shaking the Sylphyo from top to bottom. The intensity of the attack will be proportional to the velocity of your movement. |
To stop inertial mode, just blow into the Sylphyo.

Inertial mode and shake vibrato
2.6 Elevation, roll, and compass control
Aside from inertial mode, you can also move your Sylphyo around while playing to get all kinds of different effects on your sound.
| Elevation controlElevation control works just like in inertial mode (by tilting your Sylphyo), but instead of replacing your breath it modulates sound in a certain way, which depends on the sound you’ve chosen. |
 | Roll controlRoll control is an additional way to access a second kind of sound modulation. It only works when you already play a note, and the roll angle is relative to the position of the Sylphyo when starting to play the note. |
 | Compass controlThere is also a third way to modulate sound: compass control, which behaves like roll, but takes the direction you’re heading to (when the Sylphyo is horizontal) instead of the roll angle. It can be useful to control a third kind of sound modulation in your own synths and virtual instruments, but you must enable it first in the Settings menu. |

2.7 The slider
Elevation and roll control are spectacular, and body movements are very nice to add visual expression to your performance, but sometimes you want more intimate ways to control and shape your sound. This is what the slider is for. Usually, your right thumb is placed just below the thumbrest and presses against the top of the slider.
While playing, move your thumb along the surface underneath the thumbrest, and listen how it affects the sound. The effect should be different depending on where you start touching the slider.
 | Sliding from the topIf you start touching the top edge of the slider, just below the thumbrest, and then slightly roll your thumb downwards, the current note bends downwards, until you release the slider. |
 | Sliding from the middleIf you start touching between the top and bottom edges, and then move your thumb along the entire surface, the Sylphyo modulates its timbre. The actual effect depends on which sound you’re using, and the timbre will stay that way when you stop touching the slider. |
 | Sliding from the bottomIf you start touching the bottom edge of the slider, and then move your thumb along the entire surface, you enable an effect that depends on which sound you’re using. For most sounds of the Sylphyo, it will enable you to play portamento: when you go from a note to another, the time it takes to smoothly transition between both depends on how far you’ve travelled from the bottom edge of the slider. |

2.8 Changing sounds
The sound you’ve been playing with is called MacGuffin, but there are several others to try.
To change to another sound, hold the Aodyo key using your left index finger, and press the middle octave key ◆ using your left thumb. You will see the name of the current sound on the screen. Keep holding Aodyo + ◆, and use your right thumb to press the + and - settings key to switch to the next or previous sound, respectively. Once you’re done selecting your sound, just release the Aodyo key and start playing.

Having different sounds is exciting because you’ll notice it can completely change how you play the instrument. Some will encourage you to use breath control techniques, while others will leverage your movement skills. The following video should give you a good idea of the various tones and styles you can achieve with the first sounds.

You will find a complete description of all the internal sounds in one of the later sections.
2.9 Adjusting breath resistance
If you find your Sylphyo doesn’t offer enough resistance to your breath, you can adjust its air exhaust size at the bell and change its breath settings.
In order to make this process easier, we sell a breath adjustment kit with three plugs offering different resistances. You can also 3D-print them yourself by getting our STL files on Thingiverse.
2.9.1 Overview
Our kit offers three numbered plugs, drilled to different diameters. The higher the force, the quicker the pressure increases while breathing into the Sylphyo.

| Force | Hole diameter |
|---|---|
| 1 | 4.1 mm (0.161 in) |
| 2 | 3 mm (0.118 in) |
| 3 | 2 mm (0.079 in) |
These plugs change the volume of air needed to produce a sound with the same breath settings. Therefore, plug #3, which requires less air, will avoid the feeling of breathlessness that can occur when using a Sylphyo without a plug. But it can also give the impression that not enough air is passing. Plugs #1 and #2 offer intermediate sizes so as to find the perfect tradeoff for your needs.
Together with different breath settings (minimum, range, curve), these plugs will allow you to explore new playing possibilities: precision, nuance, technique, etc.
2.9.2 Setup
Insert the plug manually into the air exhaust hole located at the bell. The plug is removed the same way.

It is recommended to setup your Sylphyo in correlation with the characteristics of the plug used. To this end, just go to the Settings menu, in the Breath section, and change the settings according to the following table:
| Force | Minimum | Range | Curve | Filtering |
|---|---|---|---|---|
| 1 | 20 | 600 | Log | Yes |
| 2 | 20 | 900 | Log | Yes |
| 3 | 30 | 1200 | Linear | No |
Important
3 Using the Sylphyo as a controller
3.1 Quick start using a Windows or macOS computer
Connect your Sylphyo directly to a USB port of your computer using the included USB cable. No drivers are required: it is immediately recognized as a standard USB-MIDI peripheral.
To allow you to get playing as quickly as possible, we created Sylphyo Bench, a small application for Windows and macOS5 with five different sounds that are setup to respond well with the Sylphyo. Even if you already own other virtual instruments, you may want to keep this application handy if you want to quickly test your computer configuration or identify potential problems.
Download the Sylphyo Bench application corresponding to your operating system:
- Windows: downloads.aodyo.com/sylphyo/sylphyo-bench-win.zip
- macOS: downloads.aodyo.com/sylphyo/sylphyo-bench-osx.zip
You may then have to unzip the archive before you can open the application.

You should be able to play right away and see the on-screen controls update according to what you play.
If not, make sure the MIDI input at the top of the window is set to . If you don’t see it on the list, make sure your Sylphyo is plugged to a USB port on your computer, then hit the button before selecting the MIDI input again.
If the application reacts to your Sylphyo but doesn’t make any sound, you might have to select appropriate audio settings at the bottom of the window. First verify that the and are set to appropriate values, and click the speaker icon at the bottom left corner if it becomes dark. You can also adjust the volume control slider underneath if necessary.
If you hear a delay between your actions and the resulting sound, you may have to tweak . Put the same number in both boxes, ideally , , or samples. Note that there is always a tradeoff with audio buffer sizes: they should not be too high (or else there will be a delay between your breath and the sound), but they should not be too low either (or else you will hear cracking noises).
On Windows
3.2 Quick start with an iOS smartphone or tablet
You can also use the Sylphyo to control sounds generated from any iOS app on your iDevice (iPhone, iPod, or iPad). However, you will need to get Apple’s official Lightning to USB 3 Camera Adapter.
First, connect the adapter to a power source, such as a USB charger or a portable power bank. Then, connect the powered adapter to the Lightning port of your iDevice. Now, turn on your Sylphyo but do not use it. Instead, plug it to the powered adapter using the included USB cable.
Now that your Sylphyo is connected to your iDevice, you now need an app with sounds to control. Garageband is free and responds well to breath control.
If Garageband is not already installed, download it from the App Store. Once Garageband is open, select a Keyboard track. Then, tap the downwards arrow in the upper left corner of the screen, and select the last item of the menu ( in the image below).

Then, go to and select Retro Lead. You can now play your Sylphyo and you will hear the sound coming out of your iDevice.
Garageband has many other interesting sounds in the section, as well as in the , , and section. The latter contains brass and woodwind sounds as well.
Besides Garageband, you can find other iOS apps that work out of the box with the Sylphyo, such as Yamaha Synth Book (free, select AN2015 to access 128 synth sounds such as 07 Odyssolo) and bismark bs-16i (paid). In addition, there are many more paid iOS apps that can be quickly setup to accept most MIDI messages sent by the Sylphyo (mainly the one controlled by breath intensity, CC11): Thumbjam, Propellerhead Thor, Yonac Kauldron, iProphet and other Arturia synth apps, Korg apps such as iM1, iWavestation, and ODYSSEi, iGear Instruments Laplace… See below for details on how to configure them.
3.3 Setting up virtual instruments and apps to work with the Sylphyo
Your Sylphyo is automatically recognized as a standard USB-MIDI device by your computer, smartphone, or tablet, hence you can directly use any virtual instrument (VSTi, Audio Unit, app…) that accepts MIDI.
Note
However, many virtual instruments are not made for wind controllers and might not respond to your breath and to the other controls. In this case, you might need to assign some of their parameters to the MIDI messages sent by the Sylphyo.
See the documentation of your virtual instrument or plugin host to learn how to control parameters through MIDI. Usually, a MIDI Learn function will allow you to visually select a parameter, and then to send the MIDI message (usually a MIDI CC) you’d like to assign to this parameter.
To facilitate the mapping of a specific control of the Sylphyo through MIDI Learn, go to the Settings menu in the section, select the relevant control using ↑/↓ or the slider, and blow into your Sylphyo to send only the corresponding MIDI message.
Without MIDI Learn, you will have to enter the MIDI message manually. At the end of this section, you will find a summary table of the MIDI messages sent by your Sylphyo that you can map to parameters of your virtual instrument.
We have successfully used the following virtual instruments and audio workstations with the Sylphyo:
- Audio Modeling / SWAM (audiomodeling.com, paid)
We highly recommend the Audio Modeling instruments based on their SWAM engine. They offer very realistic and tremendously expressive control of many classical instruments (saxophones, flutes, clarinets, double reeds, brass instruments, violin and other stringed instruments…). For the best effect with SWAM instruments, please follow our recommendations at the end of this section.
- Garageband (apple.com, free, Mac only) and Logic Pro (paid)
Most included virtual instruments work out of the box.
- Massive (native-instruments.com, paid, demo available)
Use MIDI Learn to assign breath intensity and other controls to sound parameters.
- Live (ableton.com, paid, 30-day trial available)
Many Live instruments can be controlled using the Sylphyo if you use Aftertouch instead of MIDI CC 11 (see the section of the Settings menu). Some instruments, such as Operator or Wavetable, require that you manually map Aftertouch to volume and/or filter frequency, for example.
- Reason (propellerheads.se, paid, 30-day trial available)
The Subtractor synth has a Ext. Mod section where you can directly assign breath intensity (select Expr) to variations of sound intensity (Amp) or timbre (F. Freq). To control other synths, use a RPG-8 arpeggiator and route the relevant CV outputs to another device’s inputs (especially Expression CV Out). If needed, split outputs using one or more Spider CV.
3.4 Default MIDI mappings and general recommendations
Your Sylphyo assumes a default pitch-bend range of ±2 semitones.
The following table summarizes the MIDI messages sent by the Sylphyo for each of the parameters you control, with the default mapping (although you may have to enable some of these parameters first). You can always change these messages in the section of the Settings menu.
| Parameter | Default MIDI message to map |
|---|---|
| Breath intensity | CC 11 (Expression) |
| Slider control | CC 1 (Modulation) |
| Slider control (from top edge) | CC 12 (Effect Controller 1) |
| Slider control (from bottom edge) | CC 13 (Effect Controller 2) |
| Elevation angle | CC 75 (Sound Controller 6) |
| Roll angle | CC 76 (Sound Controller 7) |
| Compass direction | CC 77 (Sound Controller 8) |
| Key-bend (control) | CC 78 (Sound Controller 9) |
If you cannot use these mappings (e.g., with a simple Soundfont expander or sample-based synthesizer), you can at least configure the Sylphyo to use dynamic velocity: the velocity of the MIDI notes you play will be commensurate to the intensity of your breath at the beginning of the note. To do so, go to the section of the Settings menu, and set the parameter to Dynamic.
3.5 Playing the SWAM virtual instruments
Audio Modeling’s SWAM Engine virtual instruments are arguably one of the best options out there if you’re looking for realistic reproductions of the beautiful acoustic sound of traditional wind and string instruments.
However, because they’re designed to be played live and support many different controllers, they offer a large number of settings that can be difficult to master. And while the default settings are perfectly fine when starting to play with the Sylphyo, a tailored setup makes a world of difference in realism, expressiveness, playability, and enjoyment.
Here is a recap of our preferred settings (only those that change from the defaults), both on the SWAM virtual instrument and on the Sylphyo.
The main thing to keep in mind when configuring and playing the SWAM virtual instruments is that dynamics (i.e., the breath intensity) should work like in traditional instruments: when playing mezzoforte, the breath CC value should be near the middle of the dynamic range (or a bit lower), not near the maximum.
Just like in a traditional instrument, you should have to exert a high effort to be able to play fortissimo (that’s why I recommend to set the Sylphyo’s breath range to the maximum you can tolerate, and to set all expression curves to Linear).
If you feel it’s too quiet with these settings, then increasing the volume of your sound system is better than decreasing the dynamic range.
3.5.1 Setting up your SWAM virtual instrument
These settings can generally be applied to any SWAM engine virtual instrument (Flute, Oboe, Saxophone, Cello…), however some options are only featured in a few instruments and not others. We also differentiate some settings between the Winds and the Strings.
Don’t forget to save your settings to be able to reuse them later!
3.5.1.1 Main screen
- Attack sens.: Express
This allows you to nuance the intensity of sound only with your breath. - PB U/D: ±2.0 (Pitch-bend)
This matches the pitch-bend range of the Sylphyo. - Transit. time / Port. time: CC
This is not used on the Sylphyo now, but maybe in a future update. - Expr.Rel.Stop: OFF (Strings only)
This way, pianissimo notes sound right away. - Compressor: 1
Ensures the maximum volume difference between pianissimo and fortissimo.
3.5.1.2 Options
- Expression Curve: Lin 0 (Ex 0.7 for Strings)
This way, the amount of breath you produce to play mezzoforte notes stays in the first half of the dynamic range. - Env Attack Speed: 10.0 (Strings only)
This enables you to play tremolos by flutter-tonguing. - KS Oct.Transp.: Off
Disables the key-switch functionality that might get in your way while playing. - Attack Start: 2
Set 4 for the lowest latency, and set 0 to get more realistic attacks. - Expr. Trigger Mode: Off
This way, pianissimo notes sound right away. - Breath ppp: On
This makes the sound more realistic, and allows you to better utilize the pianissimo part of the breath range.
3.5.1.3 MIDI Mapping (for the Winds only)
This is only for the Winds family.
- Expression: CC 11
This maps to the intensity of your breath. - Vibrato Depth: Not mapped
This disables the automatic vibrato. Use Shake vibrato instead. - Harmonic Structure: CC 76
This maps to roll control. It slightly changes the sound depending on your posture. - Growl: CC 1
This maps to the slider. It allows you to make growling sounds when you slide downwards from the middle (get back to a clean sound by sliding upwards from the middle). - Formant: CC 75
This maps to elevation control. It adds a bit of brillance when your Sylphyo is horizontal, and makes the sound darker when it is vertical. - OverBlow (ON OFF): CC 13
This maps to the bottom edge of the slider. It offers a transient way to do overblowing.
3.5.1.4 MIDI Mapping (for the Strings only)
This is only for the Strings family.
- Expression: CC 11
This maps to the intensity of your breath. - Vibrato Depth: Not mapped
This disables the automatic vibrato. Use Shake vibrato instead. - Accent: CC 76
This maps to roll control. It slightly changes the sound depending on your posture. - BowPressure: CC 1, from 64 to 127
This maps to the slider. It allows you to make scratching sounds when you slide downwards from the middle (get back to a clean sound by sliding upwards from the middle).
Alternatively, assign CC 1, from 0 to 127, to Play Mode instead if you’d like to switch to Pizzicato and Col Legno playing during your performance. - Bow Position: CC 75, from 64 to 0
This maps to elevation control. It positions the bow further from or closer to the bridge, adding a bit of brillance when your Sylphyo is horizontal. - Harmonics: CC 13
This maps to the bottom edge of the slider. It offers a transient way to perform two levels of harmonics.
3.5.2 Settings on the Sylphyo
All these settings can be found in the Settings menu. Please note that while the following settings will improve your experience with SWAM virtual instruments, they might not be good for playing with some other virtual instruments. Also, make sure you are on the last version of the internal software.
3.5.2.1 MIDI Mapping
- Breath > Breath rate: Medium to Maximum
This depends on the processing power of your computer; the higher the better. This allows flutter-tonguing and other very quick effects to be played with higher fidelity by SWAM virtual instruments. - Velocity: 127
This disables dynamic velocity, which introduces a very slight delay and is not needed with SWAM virtual instruments.
3.5.2.2 Breath
- Range: 800 to 3000
Set this to the highest possible value that doesn’t make you breathless. If you want to increase air resistance to get closer to, e.g., a saxophone feel, cover part of the hole in the bell with some adhesive tape. - Curve: Linear
You might prefer the default Log curve, but Linear allows you to play pianissimo to mezzoforte comfortably in the first half of the dynamic range of the SWAM virtual instruments, and to be still able to go up to fortissimo if you put in extra effort.
3.5.2.3 Keys
- Key-bend (BETA): Disabled (Enabled for Strings)
It is more useful to be able to bend both sides on the Strings, but perfect key-bends are a bit difficult to perform. - Key noise (BETA): if you like it, Enabled (Disabled for Strings)
With the SWAM winds, this allows you to make key noises without even blowing, just by touching the keys of the Sylphyo.
If you set this and find key noise volume too high, set Key noise to 0 or 1 in the main screen of your SWAM virtual instrument.
4 The Link receiver
The Link turns your Sylphyo into a wireless instrument, allowing you to plug it to an amp, a mixer, or a hi-fi system while you play a few meters away, without being bothered by wires. In addition, it makes your Sylphyo a wireless MIDI controller for your computer, smartphone, tablet, or hardware synthesizer.
But it is also very useful on its own. You can use the Link as a USB-MIDI router to connect MIDI devices to your computer, or use it as a synthesizer and play its sounds using another MIDI or USB-MIDI controller.
4.1 Overview
4.1.1 Front panel

- Indicator light. Tells whether there is a wireless connection to a Sylphyo:
A yellow light (pairing Link light) means the Link is looking to pair with any Sylphyo.
A green light (paired Link light) means the Link is paired and connected with a Sylphyo.
A red light (unpaired Link light) means the Link is paired with a Sylphyo but is not connected to it. - Power-on switch. Turns the Link on and off.
- ▲ and ▼ buttons. Press the ▲ or the ▼ button to switch to the next or previous sound.
Pressing ▲+▼ at the same time restarts the pairing process.
4.1.2 Rear panel

- Headphone output port (6.35mm stereo jack). Play the Sylphyo wirelessly with headphones.
- Line input port (6.35mm stereo jack). Mix any sound source to your own sound.
- Line output ports (left and right 6.35mm mono jacks). Play the Sylphyo wirelessly on an amp, a mixer, or a hi-fi system.
- MIDI ports (DIN). Connect a MIDI controller to play the Link as a synthesizer (MIDI in), or wirelessly control a hardware synth using your Sylphyo (MIDI out).
- USB host port (USB A). Connect a USB-MIDI controller to play the Link as a synthesizer, or use your Sylphyo to wirelessly control a synth that takes USB-MIDI input.
- USB power supply port (USB Mini-B). Provides power to your Link. Also allows you to use your Sylphyo as a wireless MIDI controller to control virtual instruments on your computer, smartphone or tablet.
4.2 Pairing with a Sylphyo
Connect the Link to the mains using the included USB cable and charger. The cable must be connected to the smaller USB power supply port of the Link.
Then, turn on your Link using the power-on switch, and turn on your Sylphyo as well. If the Link displays a green light (paired Link light), then they are already paired (i.e., they already know each other), and you can skip the rest of this subsection.
Else, you will need to initiate pairing on both sides before being able to use your Sylphyo wirelessly. Each side will then look for a counterpart that is available, and once they have found each other they will remember their association.
First, on the Link side, press both ▲ and ▼ at the same time to start the pairing process. The light will become yellow (pairing Link light) until the Link has found an available Sylphyo.
Then, on your Sylphyo, go to the settings menu by holding the Aodyo key while swiping your thumb from the bottom to the top of the slider. Make sure the item is checked, and select the item just below to start the pairing process from the Sylphyo side. The icon of the menu item should become (pairing symbol) until the Sylphyo has found an available Link.
A few moments after, you should see the light changing to green (paired Link light) on your Link, and the icon changing to (paired symbol) on your Sylphyo: your Sylphyo and Link are paired!
If not, just restart the pairing process again.
From the moment your Sylphyo and Link are paired, they will constantly look for each other. If your Sylphyo doesn’t find your Link, it will display the (unpaired symbol) icon. If your Link doesn’t find your Sylphyo, it will display a red light (unpaired Link light).

4.3 Playing wirelessly using the internal sounds
If your Sylphyo and Link receiver are paired, you can now play wirelessly.
Connect the Link to a power supply. Then, connect it to an amp, a mixer, a hi-fi system, or any speakers or sound system, using either the headphone output port or the line output ports (the sound will be louder when using the headphone output port).
Finally, turn on your Link and your Sylphyo, and play. In addition to hearing sound, you should see the indicator light responding to your breath.

From then on, to use your Sylphyo wirelessly as a controller, you can connect your Link to any other equipment you would have directly connected your Sylphyo to, and it will transparently convey what you play on your Sylphyo.
4.4 Playing wirelessly with a computer
Connect the included USB cable to the smaller USB power supply port of the Link, connect the other end to a USB port on your computer, and turn on your Link. As with the Sylphyo, no drivers are required, and it should be immediately recognized as a standard USB-MIDI peripheral.
You can use Sylphyo Bench or any virtual instrument just like you would do when the Sylphyo is connected directly. Just turn on your Sylphyo and you can start playing.

Note that the Link shows up in your computer as three different MIDI input/output ports in the following order:
- . This is the wireless MIDI input and output to your Sylphyo.
- . This represents the two MIDI DIN ports on the rear panel of your Link, which you can use to communicate with other hardware.
- . This represents the USB-MIDI device, if any, connected to the USB host port of your Link.
4.5 Playing wirelessly with an iOS smartphone or tablet
Playing wirelessly with an iOS smartphone or tablet is no different from playing with a direct USB connection to the Sylphyo. You still need to get Apple’s official Lightning to USB 3 Camera Adapter.
First, turn off your Sylphyo if it is powered on. Connect the adapter to a power source, such as a USB charger or a portable power bank. Then, connect the powered adapter to the Lightning port of your iDevice, and connect your Link receiver to the powered adapter using the included USB cable. Now, turn on your Link, wait a few seconds, then turn on your Sylphyo. You should now be able to play on any music app that handles MIDI.

4.6 Playing wirelessly with a hardware synthesizer
You can control any MIDI-compatible hardware synthesizer with the Sylphyo+Link. However, you will need to get a MIDI cable to connect your synthesizer to the Link.
First, connect the Link to a power supply. Then, plug one end of the MIDI cable to the MIDI Out port of your Link, and plug the other end into the MIDI In port of your synth. Finally, turn on your Link and Sylphyo, as well as your synth.
You should now be able to play, but note that synthesizers specialized in wind instruments simulations need to receive breath control data on MIDI CC2, in which case you will have to change the MIDI Mapping configuration of the Sylphyo in the section of the Settings menu.
We have successfully used the following synthesizers with the Sylphyo: Waldorf Blofeld, Korg Kronos, Arturia Origin, Mutable Instruments Elements and Shruthi1. Axoloti Core, Yamaha VL-70m, and Nord Modular G2. See also the great patches at www.patchmanmusic.com.

4.7 MIDI routing
The following diagram explains the routing between the different MIDI inputs and outputs:

5 Settings
On the Sylphyo, settings can be quickly accessed using the Aodyo key (Aodyo), which you can find in the upper part of the front of the instrument.
From the playing position, you can easily reach the Aodyo key with your left index finger. Position your left thumb near the octave keys, and position your right thumb near the slider or the settings keys.
There are two places from which you can setup the Sylphyo in various ways:
- Quick settings allow you to quickly change the base key, the MIDI channel, and other parameters.
- the Settings menu offers other, more specific but less often used parameters.
5.1 Quick settings
We designed Quick settings so that once you have learned how to operate them, you can quickly change a setting in the middle of your performance, without even having to look at the display.
Each octave key allows you to access a different Quick setting. In addition, there are two additional settings that are accessed differently.
To enter Quick settings, hold the Aodyo key, as well as the octave key corresponding to the quick setting you’d like to change (see below). To get out of Quick settings, simply stop touching the Aodyo key. When inside a Quick setting, you can adjust the value either by pressing settings keys + or -, or by sliding upwards or downwards on the slider.
| Octave key | Icon | Quick setting and meaning |
|---|---|---|
| ↑ | (base key symbol) | Base key Change the base pitch of the Sylphyo (C3 by default). |
| ◆ | (preset symbol) | Sound and program change Change the current sound, and send a MIDI program change message for the current MIDI channel. |
| ↓ | (MIDI symbol) | MIDI Channel Change the MIDI channel the Sylphyo sends its messages to (Channel 1 by default). |
To access the additional parameters (Volume and Breath intensity CC), just hold the Aodyo key and tap the slider. Perform more taps to access the other additional parameters, and adjust their value just like other quick settings.
5.2 Settings menu
The Settings menu allows you to change many parameters that are less often tuned.
To enter the Settings menu, hold the Aodyo key and swipe your thumb all the way from the very bottom to the top of the slider6.
Once in the menu, to select a menu item, tap the ↑ and ↓ octave keys, or slide upwards or downwards on the slider. To confirm the menu item, execute its action, or start modifying its value, press the ◆ octave key, or tap the slider.
To go back a page, tap the Aodyo key, or swipe the slider from top to bottom. To exit the Settings menu, repeatedly tap the Aodyo key, or swipe the slider from top to bottom while holding the Aodyo key.
The following will recapitulate the different sections of the Settings menu.
5.2.1 Sound
This is where you can setup the internal sounds of the Sylphyo and Link.
Set the volume of the internal sounds.
Default: 80%
Adjust the general level of reverb in all internal sounds.
Default: 100%
5.2.2 MIDI Mappings
This is where you review or select which MIDI messages (e.g., MIDI CC) are sent by the Sylphyo for every gesture you can make while playing.
Set the MIDI message (CC or Aftertouch) sent in response to the intensity of your breath. If no MIDI message is selected, then the Sylphyo will not send anything regarding breath and will send MIDI note messages every time a new note is selected using the note keys.
Default: CC 11 (Expression)
More options
Set up to three MIDI messages (CC or Aftertouch) sent in response to the intensity of your breath.
Default: only CC 11 (Expression)
Set the rate at which breath MIDI messages are sent. This does not affect the response time of the Sylphyo, but it does affect the effectiveness of advanced breathing techniques. You usually want the highest frequency possible, but some virtual instruments, apps, or synthesizers may not be able to handle higher rates.
Default: Medium (250 Hz)
Tell if the rate of the breath MIDI messages must be per CC (all breath CCs are sent as a bunch, N times per second, as per the selected rate) or global (each breath CC is sent in order, one at a time, such that the total of breath MIDI messages is not more that N per second, no matter the CC).
Default: Enabled
The Sylphyo normally waits until the last breath MIDI message (of the Send to, …and, …and list) has been sent before sending note on/off messages. But if you feel that the delay is too long, or that techniques like fluttertongue suffer too much, disable this to send note on/off messages as early as possible.
Default: Enabled
Set the velocity value sent with every note. You can select any fixed velocity value from 1 to 127, or select Dynamic if you want the Sylphyo to set velocity based on the intensity of your breath.
Default: 127
More options
The time the Sylphyo takes to determine the velocity of a note beginning from your breath. With a smaller delay, you might have to use more breath attack to have a high velocity.
Default: 20ms
The maximum velocity value that can be reached (from 1 to 127). It can be useful to set it to 100 as some virtual instruments (like in Garageband) use velocities 101 to 127 for special effects (e.g., bass slaps).
Default: 100
Set the MIDI CC sent when moving the thumb across the slider.
Default: CC 1
Set the MIDI CC sent when moving the thumb across the slider, if the slide has begun on the top edge of the slider and a Top edge slider function is set in the section.
Default: CC 12
Set the MIDI CC sent when moving the thumb across the slider, if the slide has begun on the bottom edge of the slider and a Bottom edge slider function is set in the section.
Default: CC 13
Set the MIDI CC sent when varying the elevation angle of the Sylphyo if the Elevation control option is set in the section.
Default: CC 75
Set the MIDI CC sent when varying the roll angle of the Sylphyo if the Roll control option is set in the section.
Default: CC 76
Set the MIDI CC sent when varying the compass direction of the Sylphyo if the Compass control option is set in the section.
Default: CC 77
Set the MIDI CC sent when performing a key-bend on the keys of the Sylphyo if the Key-bend (BETA) option is set to Control in the section.
Default: CC 78
Program change
By enabling this option, the Sylphyo will send Bank Select MIDI messages before a Program Change message is sent. It can be useful for some synths where the sound cannot be changed if the bank is not systematically selected right before. See the manual of your synth for help on how these options should be configured.
Default: Disabled
The most significant byte of the bank to select (sent as MIDI CC 0).
Default: 0
The least significant byte of the bank to select (sent as MIDI CC 32).
Default: 0
Set the time before a note-off MIDI message is sent. Increasing the delay will help the Sylphyo send no more MIDI note messages than is necessary, but might prevent the MIDI flow from accurately describing dead notes and flutter-tongues. Decreasing the delay will help polyphonic synthesizers better understand the MIDI flow from the Sylphyo.
Default: 10ms
5.2.3 Breath
This section allows you to setup the breath sensor of the Sylphyo.
Set the minimum amount of breath intensity (in arbitrary units, between 0 and 3000) that will trigger a note start. Usually, you might want to decrease the minimum to get the fastest response, or to increase it to avoid spurious notes.
Default: 20
Set the dynamic range of breath intensity (in arbitrary units, between 0 and 3000). A lower value allows you to reach the maximum note intensity with less air, while a higher value allows you more precise control of the breath response.
Default: 600
Set the curve of the breath response, between Linear (more realistic), Logarithmic (faster response with less breath), and Lin-log (intermediate curve).
Default: Logarithmic
Smoothen the data of the breath sensor, while keeping reactivity intact, to avoid artifacts in some synths. If you play with a plug or cover some of the exhaust hole, you do not need this setting, and we recommended to disable it so that fast advanced techniques such as flutter-tonguing and growling can be reproduced without any issue.
Default: Enabled
5.2.4 Keys
This section allows you to change the fingerings of the Sylphyo, as well as several parameters and functions pertaining to the note keys.
If you are used to a particular wind instrument, you can select the corresponding fingering in this list. For details on the fingerings, please see the corresponding section at the end of this guide.
Default: Recorder
More options
Determine the behavior of the octave keys. Here you can select whether to use 3 or 5 keys, and how many octaves you can reach using these keys. The (+2) variants extend the range to two additional octaves: you can reach the highest one by moving the thumb to the topmost key and then moving it further upwards out of the key, and likewise you can reach the lowest octave by moving the thumb to the bottommost key and then moving it further downwards out of the key.
Default: 5
When enabled, the direction of octave keys is turned upside down.
Default: Disabled
When enabled, the left little finger key acts as a flat key instead of a sharp key (in fingerings where this makes sense).
Default: Disabled
When enabled, the right little finger key acts as a sharp key instead of a flat key (in fingerings where this makes sense).
Default: Disabled
Some people use copper tape to extend the sensing area of some keys, so as to be more comfortable when playing. With this option, the + key can be used as an additional Bb bis key, and the - key can be used as an additional low C key, by making a path with copper tape from each of the settings keys to their corresponding desired position on the front of the Sylphyo. This option is only available with the Sax and EWI fingerings, and when using 3 or 3(+2) octaves.
Default: Disabled
Whether to play the same note twice when performing two consecutive fingerings that lead to the same note.
Default: Disabled
Set the time taken to react to changes in fingering (in milliseconds, between 0ms and 79ms). Increase reaction time if you hear unintended notes when playing legato: if so, the Sylphyo reacts too fast to your finger movements. Conversely, decrease reaction time if you’d like to make faster trills and other effects.
Default: 25ms
Set the additional time taken to react to changes in fingering when changing from one octave key to another (in milliseconds, between 0ms and 79ms). Increase reaction time if you hear unintended notes when playing legato and “crossing the break”: if so, the Sylphyo reacts too fast to your finger movements.
Default: 30ms
Increase sensitivity for the octave keys.
Default: Enabled
When set to Pitch-bend +, allows note keys to behave like recorder tone holes with respect to pitch-bend: the amount of skin in contact with the bottommost key determines whether the note is bend upwards, and by which amount (to do so, you can either slide your finger on the key, or raise it slightly). When set to Control, the same gesture allows you to control any CC (set in the MIDI Mappings section) instead of pitch. Note that this option will soon be available for Sylphyo Pearl Limited Edition.
Default: No
Generate MIDI note-on/note-off messages even without breathing into the Sylphyo. This is used to hear key noise with the Audio Modeling / SWAM virtual instruments.
Default: Disabled
5.2.5 Slider
In this section, you will be able to configure the various functions of the slider.
Select the main function of the slider, between None, Control (issue the control CC defined in the section during contact, and return to 0 as soon as there is no contact), Control (latch) (same, but do not return to 0), Breath (play notes using the slider instead of your breath), Pitch-bend ± (use the slider like a pitch-bend wheel), Pitch-bend + (only bend upwards), or Pitch-bend - (only bend downwards).
Default: Control (latch)
Select the function of the slider if you start sliding by touching its top edge (just below the thumbrest).
You can choose between Nothing, Ignore slides, Control (issue the control CC defined in the section during contact, and return to 0 as soon as there is no contact), Control (latch) (same, but do not return to 0), Breath (play notes using the slider instead of your breath), Pitch-bend + (bend upwards, and return to 0 as soon as there is no contact), or Pitch-bend - (same, but bend downwards).
Default: Nothing
Select the function of the slider if you start sliding by touching its bottom edge (at the end of the sliding surface). See above for a list of functions.
Default: Control
Adjust the size of the top and bottom slider edges (in millimeters, between 2mm and 20mm).
Default: 8mm
5.2.6 Movement
In this menu, you can activate different features of the Sylphyo related to movement and inertial control.
Allow the activation of the inertial mode by shaking the Sylphyo once in a downwards movement, while touching the slider surface using the thumb. To exit inertial mode, just blow into the mouthpiece.
Default: Enabled
Allow the Sylphyo to interpret slight repeated shakes away from and towards your mouth as vibrato.
Default: Enabled
More options
Allow the Sylphyo to send MIDI CC messages (defined in the section) corresponding to the elevation angle of the Sylphyo (altitude of the bell) when not in inertial mode.
Default: Enabled
More options
When active, the value is bidirectional; i.e., it is different depending on whether the bell is higher than the mouthpiece.
Default: Disabled
When active, the elevation angle is directly derived from raw sensor values, instead of being relative to the horizontal position.
Default: Disabled
The relative angle (compared to the horizontal position) that will yield a value of zero. This only makes sense when Absolute is disabled.
Default: ±35°
Allow the Sylphyo to send MIDI CC messages (defined in the section) corresponding to the roll angle of the Sylphyo (around its axis, when it is almost horizontal).
Default: Enabled
More options
When active, the value is bidirectional; i.e., it is different depending on whether the Sylphyo is rolled to the left or to the right. In this case, the central MIDI CC value is 64.
Default: Disabled
When active, the roll angle is directly derived from raw sensor values, instead of being relative to the angle of the Sylphyo when the current note started.
Default: Disabled
The relative angle (compared to the angle of the Sylphyo when the current note started) that will yield the maximum value. This only makes sense when Absolute is disabled.
Default: ±5°
Allow the Sylphyo to send MIDI CC messages (defined in the section) corresponding to the compass direction of the Sylphyo (where it is heading when it is almost horizontal).
Default: Disabled
More options
When active, the value is bidirectional; i.e., it is different depending on whether the Sylphyo heads towards your left or your right. In this case, the central MIDI CC value is 64.
Default: Disabled
When active, the compass direction is directly derived from raw sensor values, instead of being relative to the direction of the Sylphyo when the current note started.
Default: Disabled
The relative direction (compared to the direction of the Sylphyo when the current note started) that will yield the maximum value. This only makes sense when Absolute is disabled.
Default: ±15°
When active, there is no need to be physically touching the Sylphyo for the inertial controls (shake vibrato, as well as elevation, roll, and compass control) to be active.
Default: Disabled
5.2.7 Other main menu items
Change the reference note of the Sylphyo.
Default: C3
Select the MIDI channel to which the Sylphyo sends its MIDI messages.
Default: MIDI Channel 1
- Invert display
Select this item to switch between a white-on-black and a black-on-white display.
- En français
Select this item to switch the Sylphyo to the French language.
- Wireless (Link)
Disable this item to prevent the Sylphyo from sending any wireless data.
- Receiver device
Select this item to pair the Sylphyo with a Link.
- Diagnostics
Display some information (such as the version of the internal software and various sensor values) that our technical support might want to get in order to troubleshoot your Sylphyo.
- Reset
Perform a factory reset. This changes all the settings of your Sylphyo to the default ones.
6 Sounds
6.1 MacGuffin
Bright, brassy, inconspicuous, yet surprisingly able to sustain even the most trancey of anthems when least expected.

Slider
Timbre
Thickens the sound in a “trance” fashion.Slider from the bottom edge
Portamento
Increases the time to smoothly transition to another note.Elevation
High-pass filter
Thins the sound.Roll
Filter resonance
Adds a “wow” quality to attacks.

6.2 Daphnis Flute
A windy flute equally suitable for light folk melodies, ambient music, and huge bass lines.
Slider
Bass voice
Adds a bass voice.Slider from the bottom edge
Fife voice
Adds a high-pitched voice.Elevation
Reverb
Emphasizes the reverberation effect.Roll
Less air
Removes air noise.

6.3 House of Chords
A collection of various organ flavors to morph between, with the ability to perform chord progressions. Especially good for deep house, blues, or funk grooves.
Slider
Chord
Play a chord instead of a single note: min, min7, min9, 7#5, 7, maj9, maj7, maj, 5, detune.Slider from the bottom edge
Portamento
Increases the time to smoothly transition to another note.Elevation
Timbre
Morphs between 12 different timbres.Roll
Filter resonance
Adds a “wow” and ringing quality to the sound.

6.4 Meow
A saw-style sound that can be turned into trenchant bass lines, screaming acid patterns, and delicate melodies. Extremely responsive to different breathing and tonguing attacks. Even starts meowing when movement is involved.
Slider
Brilliance
Adds brightness to the sound.Slider from the bottom edge
Portamento
Increases the time to smoothly transition to another note.Elevation
Harmonics
Makes the sound scream.Roll
Harmonics tuning
Detunes the screaming part of the sound up to a major third higher, with max. brilliance.

6.5 Sync Asset
Classic “hard sync” synth tone for funky leads or fat bass sounds, with all the richness and timbral evolution possibilities at your fingertips.
Slider
Sync envelope
Controls how the sync effect evolves.Slider from the bottom edge
Portamento
Increases the time to smoothly transition to another note.Elevation
Sync amount
Emphasizes the sync effect.Roll
Pulse width
Thins the sound.

6.6 Soyuz LT
A pure, soft sound for ethereal moods, space FX, and sub basses, made of cosmic waves that either untangle or unite in response to your gestures and movement.
Slider
Brilliance
Adds brightness to the sound.Slider from the bottom edge
Portamento
Increases the time to smoothly transition to another note.Elevation
Reverb / Timbre
Emphasizes the reverberation effect; with brilliance, changes timbre.Roll
Timbre
With brilliance, changes timbre even more.

6.7 Corroboree
The sound of tribes from ancient to modern ages. By the power of your breath and tonguing, the wind can become an ethnic percussion, a spirit catcher, or a hardcore kick.
Slider
Overdrive
Adds distortion to the sound.Slider from the bottom edge
Reverb diffusion
Turns reverberation into echoes.Elevation
Reverb
Emphasizes the reverberation effect.Roll
Reverb damping
Darkens the reverb and adds echoes.

6.8 Chalumeau
This physical model inspired by the ancestor of the clarinet will lead you from the rich and warm sounds of folk melodies to more psychedelic sounds.
Slider
Reed stiffness
Makes sound richer, but harder to control.Slider from the bottom edge
Portamento
Increases the time to smoothly transition to another note.Elevation
Brilliance
Adds brightness to the sound.Roll
Inharmonicity
Creates weird intervals and beating tones.

6.9 Chameleon Bass
A classic synth sound straight from the 70’s. Versatile and funky, good for heavy basses and high-pitched leads.
Slider
Brilliance
Adds brightness to the sound.Slider from the bottom edge
Portamento
Increases the time to smoothly transition to another note.Elevation
Attack and Timbre
Controls how attacks evolve and influence timbre.Roll
Filter resonance
Emphasizes the “wow” quality of the sound.

6.10 Electro Fuse
A sound for guitar heroes, overdriven to the extreme, with plenty of feedback that you can accurately control just by moving your instrument around.
Slider
Attenuation
Darkens the sound.Slider from the bottom edge
Portamento
Increases the time to smoothly transition to another note.Elevation
Feedback
Adds feedback to the distorted sound.Roll
Attenuation
Darkens the sound and reduces distortion.

6.11 Sylphatty
A sound inspired by legendary analog synths and their legacy, featuring breath-controlled filter sweeps and gesture-controlled screams and rattles.
Slider
Attenuation
Gently darkens the sound.Slider from the bottom edge
Portamento
Increases the time to smoothly transition to another note.Elevation
Sync frequency
Controls the sync effect.Roll
LFO rate
Makes the sound oscillate to the point of “rattling”.

6.12 Unreasonable
A dirty, gritty bass sound from the beginning of the century, with comb-filtered goodness. Please make sure to wash your hands after touching it!
Slider
LFO rate
Controls how fast the sound oscillates.Slider from the bottom edge
Portamento
Increases the time to smoothly transition to another note.Elevation
LFO depth
Controls how much the sound oscillates.Roll
Harmonics
Adds high-pitched elements to the sound.

6.13 Justin Whistle
A sound inspired by penny whistles and other high-pitched traditional flutes, suitable for celtic music, kwela, and other kinds of folk music.
Slider
Attenuation
Makes the sound thinner.Slider from the bottom edge
Portamento
Increases the time to smoothly transition to another note.Elevation
Reverb
Emphasizes the reverberation effect.Roll
Inharmonicity
Creates weird intervals and beating tones.

6.14 Braveheart
A bagpipe sound featuring a chanter and a slider-controlled drone, which is tuned to the last note played before activating the slider.
Slider
Drone
On activation, tunes the drone, and otherwise makes it louder or quieter.Slider from the bottom edge
Portamento
Increases the time to smoothly transition to another note.Elevation
Reverb
Emphasizes the reverberation effect.Roll
Timbre
Slightly changes the timbre of the chanter.

6.15 Cheap Tunes
The retro sound of classic video games, from main themes to coin pickups, with a hint of bitcrushing. All their base are belong to you!
Slider
Second voice
Adds a delayed voice to the upper octave (reverts to a single note when at 100%).Slider from the bottom edge
Portamento
Increases the time to smoothly transition to another note.Elevation
Downsampling
Degrades and distorts the sound.Roll
Resolution
Bitcrushes the sound, making it more noisy and clicky.

6.16 Vocobot
A breath-controlled voice synthesizer that simulates the production of different vowels. Great for robotic and guttural sounds.
Slider
Vowels
Selects a different range of vowels to morph between using breath.Slider from the bottom edge
Portamento
Increases the time to smoothly transition to another note.Elevation
Filter resonance
Adds a “wow” and ringing quality to the sound.Roll
Timbre
Darkens the sound.

6.17 Sylphyridoo
From tribal vibes to acid leads and basses, a sound to explore with breath or movement control.
Slider
Harmonics
Makes harmonics more prominent.Slider from the bottom edge
Portamento
Increases the time to smoothly transition to another note.Elevation
Growl
Makes the sound rattle.Roll
Timbre
Brightens the sound.

6.18 Vagualame
Turn your Sylphyo into an ocean wave generator and control the tides with your movements.
Slider
Tide height
Makes the waves larger.Slider from the bottom edge
Swell / Wind
Agitates the waves.Elevation
Swell / Wind
Agitates the waves.Roll
Surf amount
Increases spume when waves hit the land.

6.19 Classic SineTri
An almost pure electronic sound inspired by the first analog electronic instruments.
Slider
Waveform
Enriches the sound by fading from a sine to a triangle waveform.Slider from the bottom edge
Portamento
Increases the time to smoothly transition to another note.Elevation
Delay
Adds an echo effect.Roll
Vibrato
Controls an automated vibrato effect.
6.20 Classic SquareSaw
A rich electronic sound inspired by analog synths, ready to be modulated and filtered.
Slider
Waveform
Enriches the sound by fading from a square to a saw waveform.Slider from the bottom edge
Portamento
Increases the time to smoothly transition to another note.Elevation
Depth
Thickens the sound.Roll
Timbre
Makes the sound darker by removing harmonics.
6.21 1984 Pad
A reminiscence of the iconic pad chords of the 80’s, equally suitable for sci-fi and for fluo leggings.
Slider
Chord
Fades between a major and minor chord.Slider from the bottom edge
Portamento
Increases the time to smoothly transition to another note.Elevation
Timbre
Changes the harmonics of the sound.Roll
Chorus
Controls the rate of a chorus effect.

6.22 Antimatter Pad
An atmospheric, cinematic sound, perfect for playing slow and deep chords.
Slider
Chord
Fades between a major and minor chord.Slider from the bottom edge
Portamento
Increases the time to smoothly transition to another note.Elevation
Vibrato
Controls an automated vibrato effect.Roll
Timbre
Makes the third of the chord stand out.
6.23 Kokomo Drums
A tuned percussion sound, somewhere in between steel drums, xylophones, bongos, and flower shirts.
Slider
Strike position
Determines whether the strike happens near the center or the rim.Slider from the bottom edge
Timbre
Increases attack but decreases resonance.Elevation
Ensemble
Adds another pitched voice to the upper octave.Roll
Tension
Increases the tension of the skin.

6.24 Boom Tschak
A modern take on the classic drum machine sounds. Pitch controls which percussion is played using breath, and movement changes its timbre.
Slider
Kick/snare
Fades between the family of kick, toms, rimshots and percs (0%), to that of snares and cymbals (100%).Elevation
Timbre
Darkens the sound.Roll
Decay/distortion
Increases resonance and adds distortion.
6.25 Deep Organs
Jazz and rock organ sounds inspired from the 70’s, to play with or without mustaches and long hair.
Slider
Overdrive
Distorts the sound.Slider from the bottom edge
Percussion
Adjusts the level of the organ “click”.Elevation
Chorus / Leslie
Adds an effect inspired from Leslie speakers.Roll
Vibrato
Adds an automatic vibrato that also influences the Leslie effect.
6.26 Breathed-on Bach
Organ sounds inspired from baroque and classical music, to play with or without church.
Slider
Timbre
Navigates between different harmonics.Slider from the bottom edge
Fundamental
Adjusts the level of the first harmonic.Elevation
Reverb
Increases the level of the reverb effect.Roll
Vibrato
Adds an automatic vibrato.
6.27 Da Funk
A lead sound straight from classic P-Funk albums. Free your mind… and your Sylphyo will follow!
Slider
Timbre
Changes the color of the resonance.Slider from the bottom edge
Portamento
Increases the time to smoothly transition to another note.Elevation
Resonance
Adds resonance.Roll
Vibrato
Adds an automatic vibrato.
6.28 The Big Blue
A dive into the world of deep sea creatures, where you can hear whales singing and moaning.
Slider
Echo
Accentuates the echo effect.Slider from the bottom edge
Drone
Makes the sound last arbitrarily long.Elevation
Filter
Removes low frequencies.Roll
Timbre
Changes the timbre of the sound.
6.29 Alto Sax Phi
The first offspring of our new physical modeling technology Aodyo Phi, a model of an alto saxophone sound over 3 octaves (from C2 to C5), exclusive to the Sylphyo. Your ticket to Birdland.
Slider
Brightness
Makes the sound brighter (mouthpiece tip opening).Slider from the bottom edge
Reverb
Increases the level of the reverberation effect.Elevation
Muffling
Attenuates high frequencies (breath noise, harmonics), useful to liven up the interpretation.Roll
Vibrato
Controls an automatic vibrato effect, to complement the shake vibrato.

6.30 Flute Phi
A model of a transverse flute over 3 octaves (from B2 to D6), made using our new Aodyo Phi physical modeling technology. Another Sylphyo exclusive that’ll leave you enchanted!
Slider
Attack / Overblow
Changes how attacks behave, from soft (classical music) to more noisy (jazz, ethnic music).Slider from the bottom edge
Reverb
Increases the level of the reverberation effect.Elevation
Tremolo
Controls an automatic tremolo effect, to complement the shake vibrato.Roll
Multiphonics
Imitates “multiphonics” techniques by adding a supplementary note to the one currently played.

6.31 El Harrachi Phi
An extended physical model of an Oud, a traditional plucked string instrument from the Middle East7, powered by our Aodyo Phi technology.
Slider
Phaser
Adds a slight phasing effect, especially adapted for stringed instruments.Slider from the bottom edge
Portamento
Increases the time to smoothly transition to another note.Elevation
Pluck position
Varies the position where the string is plucked between the neck and the bridge.Roll
Palm mute
Imitates a “palm mute” technique by muffling the resonance of the string.

6.32 Laraaji Phi
A model of a Zither-like instrument resembling traditional struck string instruments like the Iranian Santur8, enriched with sympathetic string resonances thanks to our Aodyo Phi physical modeling technology.
Slider
Drone
Tunes the sympathetic strings over one octave.Slider from the bottom edge
Reverb
Increases the level of the reverberation effect.Elevation
Balance
Balances levels between the struck strings and the sympathetic strings.Roll
Attack
Makes plucks more percussive.

6.33 Synthbrass 80’s
A classic synthbrass sound typically found in the synths from the 80’s. Can be played lead in its base position, and turns into a brass ensemble when using the slider.
Slider
Variation
Progressively turns the base sound into the following variations: chorus effect, brass ensemble, bigger brass ensemble, and monster synth.Slider from the bottom edge
Portamento
Increases the time to smoothly transition to another note.Elevation
Filter
Darkens the sound.Roll
Vibrato
Controls an automatic vibrato effect.

6.34 Resozen
An ambient sound from the Anyma Phi synth, adapted for the Sylphyo. Movement mode is highly recommended.
Slider
Distortion
Distorts the sounds and adds harmonics.Slider from the bottom edge
Portamento
Increases the time to smoothly transition to another note.Elevation
Vibrato
Controls an automatic vibrato effect.Roll
Resonance
Adds a resonant effect to the sound.

6.35 Trumpet
An acoustic trumpet-like sound based on our brass physical model.
Slider
Mute
Gradually puts on a trumpet mute, dampening the sound.Slider from the bottom edge
Reverb
Increases the level of the reverberation effect.Elevation
Growl
Makes the timbre grittier when blowing harder.Roll
Vibrato
Controls an automatic vibrato effect.

6.36 Muted Trumpet
An acoustic trumpet-like sound based on our brass physical model, with a trumpet mute effect. This is another version of Trumpet with alternative mappings and response.
Slider
Growl
Makes the timbre grittier when blowing harder.Slider from the bottom edge
Reverb
Increases the level of the reverberation effect.Elevation
Unmute
Gradually removes the trumpet mute, making the sound clearer.Roll
Vibrato
Controls an automatic vibrato effect.
6.37 Kalinka
A balalaika sound based on a string resonator physical model. Continuous breath control will adjust the pick tremolo effect on the string.
Slider
High-pass filter
Thins the sound.Slider from the bottom edge
Reverb
Increases the level of the reverberation effect.Elevation
Tremolo speed
Increases the time between two attacks when continuously blowing.Roll
Attack timbre
Modulates the timbre of the attacks.

6.38 Kalinka Alt
A balalaika sound based on a string resonator physical model. Continuous breath control will adjust the pick tremolo effect on the string. This is another version of Kalinka with alternative mappings.
Slider
Tremolo
Increases the time between two attacks when continuously blowing.Slider from the bottom edge
Reverb
Increases the level of the reverberation effect.Elevation
High-pass filter
Thins the sound.Roll
Timbre
Modulates the timbre of the pick attacks.
7 Fingerings
7.1 Recorder
This is the default fingering of the Sylphyo. It is designed for close compatibility with soprano recorders, and includes most Baroque and German fingerings and trills up to C at the third octave, as well as some flute-compatible fingerings.
All half-open holes in soprano recorder fingerings must be played as fully open keys on the Sylphyo. In addition, the left pinky key on the Sylphyo acts as a universal # (sharp) key, adding a semitone to any fingering.
- CXxxxOxxxX
- C#XxxxXxxxX
- DXxxxOxxxO
- EbXxxxXxxxO
- EXxxxOxxoS
- FXxxxOxosS
- F#XxxxOoxsS XxxxXxosS
- GXxxxOoooS
- G#XxxoOxxoS XxxxXoooO
- AXxxoOoooS
- BbXxoxOoooS XxoxOxoxO XxooOxooS
- BXxooOoosS
- CʹXoxoOossS
- C#ʹXoooOossS OxxoOoooO
- DʹOoxoOsssS
7.2 Clarinet
This fingering has been designed for close compatibility with Bb soprano Boehm-System clarinets, mainly in the Clarion register, with adaptations to the keys of the Sylphyo.
- CXxxxXxxxO
- C#XxxxXxxxX
- DXxxxOxxxO
- EbXxxxOxxxX
- EXxxxOxxoO
- FXxxxOxooO
- F#XxxxOoxoO
- GXxxxOoooO
- G#XxxxXoooO XxxxOoxoO
- AXxxoOoooO
- BbXxooOxooO XxxoXoooO
- BXxooOoooO
- CʹXoooOoooO
- C#ʹXoxxOxxoO OxooOoooO
- DʹXoxxOxooS OoooOoooO
- EbʹXoxxOoxoS
- EʹXoxxOoooS
- FʹXoxxXoooS
- F#ʹXoxoOoooS
- GʹXoxoOxxoS XxooOxxoO
7.3 Flute
This fingering has been designed for close compatibility with C concert (transverse) flutes, with adaptations to the keys of the Sylphyo. It includes most usual fingerings from the first octave. In addition, it extends fingerings of the beginning of the second octave (without the left index finger) up to the high A, which needs to be performed without the thumb.
- CXxxxOxxxX
- C#XxxxXxxxX
- DXxxxOxxxO
- EbXxxxXxxxO
- EXxxxOxxoS
- FXxxxOxooS
- F#XxxxOooxS XxxxOoxsS
- GXxxxOoooS
- G#XxxxXoooS
- AXxxoOoooS
- BbXxooOxooS
- BXxooOoooS
- CʹOxooOoooS XoxoOoooS
- C#ʹSoooOoooS SoxxOxxxX
- DʹXoxxOxxxO
- EbʹXoxxXxxxO
- EʹXoxxOxxoS
- FʹXoxxOxooS
- F#ʹXoxxOooxS SoxxOoxoS
- GʹXoxxOoooS
- G#ʹXoxxXoooS
- AʹOoxoOoooS
7.4 Flute (alt.)
This alternative flute fingering changes the right little finger key from a low C key to a low Eb key. In other words, performing XxxxOxxxX will not result in a C but in an Eb note.
- CXxxxXxxxO
- C#XxxxXxxxX
- DXxxxOxxxO
- EbXxxxOxxxX
- EXxxxOxxoS
- FXxxxOxooS
- F#XxxxOooxS XxxxOoxsS
- GXxxxOoooS
- G#XxxxXoooS
- AXxxoOoooS
- BbXxooOxooS
- BXxooOoooS
- CʹOxooOoooS XoxoOoooS
- C#ʹSoooOoooS SoxxOxxxX
- DʹXoxxOxxxO
- EbʹXoxxOxxxX
- EʹXoxxOxxoS
- FʹXoxxOxooS
- F#ʹXoxxOooxS SoxxOoxoS
- GʹXoxxOoooS
- G#ʹXoxxXoooS
- AʹOoxoOoooS
7.5 Saxophone
This fingering has been designed for close compatiblity with saxophones, with adaptations to the keys of the Sylphyo.
- CXxxxOxxxX
- C#XxxxXxxxX
- DXxxxOxxxO
- EbXxxxXxxxO
- EXxxxOxxoO
- FXxxxOxooO
- F#XxxxOoxoO XxxxOooxO XxxxOxoxO
- GXxxxOoooO
- G#XxxxXoooO
- AXxxoOoooO
- BbXxooOxooO XxooOoxoO XxxoOooxO XxoxOoooO
- BXxooOoooO
- CʹXoxoOoooO XxooOooxO
- C#ʹXoooOoooO
- DʹXooxOoooO
- EbʹXoooOooxO
- EʹXooxOooxO
7.6 Saxophone (alt.)
This alternative saxophone fingering changes the right little finger key from a low C key to a low Eb key. In other words, performing XxxxOxxxX will not result in a C but in an Eb note.
- C#XxxxXxxxX
- DXxxxOxxxO
- EbXxxxOxxxX
- EXxxxOxxoO
- FXxxxOxooO
- F#XxxxOoxoO XxxxOooxO XxxxOxoxO
- GXxxxOoooO
- G#XxxxXoooO
- AXxxoOoooO
- BbXxooOxooO XxooOoxoO XxxoOooxO XxoxOoooO
- BXxooOoooO
- CʹXoxoOoooO XxooOooxO
- C#ʹXoooOoooO
- DʹXooxOoooO
- EbʹXoooOooxO
- EʹXooxOooxO
7.7 Saxophone (alt. 2)
In this variant of the previous fingering, performing XxxxXxxxX will not result in a C# but in an Eb note.
- DXxxxOxxxO
- EbXxxxOxxxX XxxxXxxxX
- EXxxxOxxoO
- FXxxxOxooO
- F#XxxxOoxoO XxxxOooxO XxxxOxoxO
- GXxxxOoooO
- G#XxxxXoooO
- AXxxoOoooO
- BbXxooOxooO XxooOoxoO XxxoOooxO XxoxOoooO
- BXxooOoooO
- CʹXoxoOoooO XxooOooxO
- C#ʹXoooOoooO
- DʹXooxOoooO
- EbʹXoooOooxO
- EʹXooxOooxO
7.8 Oboe
This fingering has been designed for close compatibility with oboes, with adaptations to the keys of the Sylphyo. It includes most usual fingerings from the first octave.
- CXxxxOxxxX
- C#XxxxXxxxX
- DXxxxOxxxO
- EbXxxxXxxxO
- EXxxxOxxoO
- FXxxxXxxoO XxxxOxoxO
- F#XxxxOxooO
- GXxxxOoooO
- G#XxxxXoooO
- AXxxoOoooO
- BbXxxoOxooO
- BXxooOoooO
- CʹXxooOxooO
- C#ʹXoxxOxooX XoxxOxxxX
- DʹXoxxOxxxO XoxxOoxoX
- EbʹXoxxXxxxO XoxxXoxxO XoxxXoxoX
- EʹXoxxOoooO
- FʹXoxoOoxxO
7.9 Trumpet (EVI)
This fingering is an adaptation of the fingering system of one of the first electronic wind instruments, and it has been designed to allow brass players to quickly adapt their playing style and fingerings to the Sylphyo.

The right index, middle, and ring finger behave exactly like in a trumpet, here controlling what would be the valves. To compensate for the lack of a brass embouchure, the left index finger key can be pressed to go down by 5 semitones. The left middle and ring finger keys are almost always held to allow for a stable posture.
To sum up, from the base position (press only the left middle and finger keys), pressing or releasing other keys will add or subtract a given amount of semitones from the base C pitch:
- Left hand
- pressing the left index finger key: -5 (embouchure)
- lifting either the left middle or ring finger key, or pressing the left pinky key: +1 (non-cumulative)
- Right hand
- pressing the right index finger key: -2 (valve 1)
- pressing the right middle finger key: -1 (valve 2)
- pressing the right ring finger key: -3 (valve 3)
- pressing the right pinky finger key: +2
The EVI lefty (beta) fingering works exactly like the EVI fingering, but it inverts the roles of the hands, so that valves are played on the left hand.
- C#XxxxOxxxO
- DXxxxOxoxO
- EbXxxxOoxxO
- EXxxxOxxoO XxxxOooxO
- FXxxxOxooO
- F#XoxxOxxxO XxxxOoxoO
- GXoxxOxoxO XxxxOoooO
- G#XoxxOoxxO
- AXoxxOxxoO XoxxOooxO
- BbXoxxOxooO
- BXoxxOoxoO
- CʹXoxxOoooO
- C#ʹXoxoOoooO XoxxXoooO XoxxOoxoX
- DʹXoxxOoooX XoxxXoxoX
- EbʹXoxxXoooX
7.10 EWI
This fingering has been designed to allow players of other electronic wind instruments to quickly adapt their playing style and fingerings to the Sylphyo.

While it is based on familiar traditional woodwind fingerings, it allows for additional flexibility in the choice of alternate fingerings, which might ease the execution of some musical phrases. Also, the left pinky key acts as a universal # (sharp) key, adding a semitone to any fingering.
The EWI (alt.) fingering works exactly the same, but the right pinky key sharpens by a semitone instead of flattening by a whole tone.
- CXxxxOxxxX
- C#XxxxXxxxX
- DXxxxOxxxO
- EbXxxxXxxxO
- EXxxxOxxoO
- FXxxxOxooO
- F#XxxxOoxoO
- GXxxxOoooO
- G#XxxxXoooO
- AXxxoOoooO
- BbXxooOxooO XxooOoxoO
- BXxooOoooO
- CʹXoxoOoooO
- C#ʹXoooOoooO
- DʹXoooXoooO
7.11 Hulusi
This fingering has been designed for close compatibility with the hulusi. In addition, the left pinky key on the Sylphyo acts as a universal # (sharp) key, adding a semitone to any fingering, and the right pinky key acts as a universal b (flat) key, removing a semitone from any fingering.
- CXxxxOxxxO
- C#XxxxXxxxO
- DXxxxOxxoO
- EbXxxxXxxoO XxxxOxooX
- EXxxxOxooO
- FXxxxOoooO
- F#XxxxXoooO
- GXxxoOoooO
- G#XxxoXoooO
- AXxooOoooO
- BbXxooXoooO
- BXoooOoooX XoxxXxxxO
- CʹXoooOoooO
- C#ʹXoooXoooO
7.12 Celtic
This fingering has been designed to allow bagpipe players to quickly adapt their playing style and fingerings to the Sylphyo.
- CXxxxXxxxX
- C#XxxxOxxxX
- DXxxxOxxxO
- EbXxxxOxxoX XxxxXxxoO
- EXxxxOxxoO
- FXxxxOxoxS XxxxXxooS
- F#XxxxOxooO
- GXxxxOoooS
- G#XxxoXsssS
- AXxxoOsssS
- BbXxoxOsssS XxooXsssS
- BXxooOsssS
- CʹXoxoOsssS XoooXsssS
- C#ʹXoosOsssS
In addition to the base fingerings, removing the left index finger or the octave key adds an octave to any fingering (in a non-cumulative fashion).
7.13 Oriental clarinet
This fingering has been designed for close compatibility with modified-Albert-System oriental clarinets, with adaptations to the keys of the Sylphyo. It can be used to play middle-eastern music, and more generally world music repertoires.
- CXxxxXxxxO
- C#XxxxXxxxX
- DXxxxOxxxO
- EbXxxxOxxxX XxxxOxoxO
- EXxxxOxxoO
- FXxxxOxooO
- F#XxxxOoxoO
- GXxxxOoooO
- G#XxxxXoooO XxxoOxsoO XxxoOsxoO
- AXxxoOoooO
- BbXxooOxooO XxooOoxoO XxxoXoooO
- BXxooOoooO
- CʹXoooOoooO
- C#ʹXoooOoxoO XoooOooxO
- DʹXoxxOxxxO
- EbʹXoxxOxoxO
- EʹXoxxOxxoO
- FʹXoxxOxooO XoxxXoooO
- F#ʹXoxxOoxoO
- GʹXoxxOoooO
- G#ʹXoxoOxooO XoxoOoxoO XoxoOooxO
- AʹXoxoOoooO
- A#ʹOoxoOoooO
7.14 Saxophone (old)
This fingering corresponds to the former Saxophone fingering in the first few versions of the Sylphyo internal software.
- CXxxxOxxxX
- C#XxxxXxxxX
- DXxxxOxxxO
- EbXxxxXxxxO XxxxOoxxO XxxxOxoxO
- EXxxxOxxoO XxxxOxoxO XxxxOoxxO
- FXxxxOxooO
- F#XxxxOoxoO
- GXxxxOoooO
- G#XxxxXoooO
- AXxxoOoooO
- BbXxooOxooO XxoxOoooO
- BXxooOoooO
- CʹXoxoOoooO XxooXoooO
- C#ʹXoooOoooO XoxoXoooO
- DʹXoooXoooO
7.15 Whistle
This fingering has been designed for close compatibility with the Irish tin whistle in C.
- CXxxxOxxxO
- C#XxxxXxxxO
- DXxxxOxxoO
- EbXxxxOxoxO
- EXxxxOxooO
- FXxxxOoosO
- F#XxxoOxssO
- GXxxoOossO
- G#XxoxOsssO
- AXxooOsssO
- BbXoxxOxssO XoxxOssxO XoxoOsssO
- BXoooOsssO
- CʹXoxxOxxxO
In addition, the left pinky key on the Sylphyo acts as a universal # (sharp) key, adding a semitone to any fingering, and the right pinky key acts as a universal b (flat) key, removing a semitone from any fingering.
7.16 Native American Flute
This provides a core set of fingerings found on most contemporary Native American flutes. The pinky keys have no effect on any of the fingerings, and the octave key can be open or closed.
Here are the primary fingerings for an A minor Native American flute.
- A,XxxxSxxxS
- CXxxxSxxoS
- C#XxxxSxoxS
- DXxxxSxooS
- D#XxxxSoxoS
- EXxxxSoooS
- FXxxoSxooS
- F#XxoxSxooS
- GXxoxSoooS
- G#XooxSxooS
- AXooxSoooS
- A#XoxxSxxxS
- BXooxSxxxS
- CʹXoxxSxxoS
- C#ʹXoxxSxoxS
- DʹXoxxSxooS
The Native American Flute+ fingering is a superset that makes use of the octave and pinky keys for additional pitches and alternate fingerings, giving access to over 3 octaves.
- A,XxxxOxxxO
- A#,XxxxOxxxX
- B,XxxxXxxxS
- CXxxxSxxoS
- C#XxxxSxoxS
- DXxxxSxooS
- D#XxxxSoxoS
- EXxxxSoooS
- FXxxoSxooS
- F#XxoxSxooS
- GXxoxSoooS
- G#XooxSxooS
- AXooxSoooS
- A#XoxxSxxxS
- BXooxSxxxS
- CʹXooxSxxoS
- C#ʹXoxxSxoxS
- DʹXoxxSxooS
- D#ʹXoxxSoxxS
- EʹXoxoSxxxS
- FʹXoxoSoxxS
- F#ʹXooxSoxxS
- GʹXoxoSxxoS
- G#ʹXoxoSooxS
- AʹXoxoSxooS
In addition, the extended fingering has an auxiliary set of patterns that support one-handed play with the left hand completely off the instrument:
- AʹOoooSxooS
- A#ʹOoooSoooS
- CʹʹOoosSxxoS
- C#ʹʹOossSxoxS
- DʹʹOoooOxxxO
- EʹʹOoooOxxxX
- FʹʹOoooOoxxO
- GʹʹOoooOoxxX
- AʹʹOoooOooxS
- CʹʹʹOoooOoxoS
(Contributed by Clint Goss)
7.17 Natural Harmonic scale
Offers a way to play Bruce Kanzelmeyer’s Natural Harmonic scale, a 16-tone microtonal scale that comprises pure intervals from the harmonic overtone series. All the notes of the scale are perfectly in tune with each other and a defined reference frequency, although some pitches included are foreign sounding to ears accustomed only to 12 EDO.
This fingering system is designed to address MIDI note numbers directly, starting with 60 (which is associated in 12-TET with middle C) and moving up the scale by whole tones (62, 64, 66, 68, etc.). The right pinky added to a fingering flattens the pitch a semi tone (one MIDI note down); the left pinky added sharpens the pitch by a semi tone (one MIDI note up). For example, when fingering MIDI note 68, adding the right pinky plays 67; adding left pinky plays note 69. As there are 16 notes per “octave”, the left thumb shifts the octave up or down by 16 tones.
Below are the fingerings for the first octave, with the corresponding MIDI notes:
- 60XxxxOxxxO
- 62XxxxOxxoO
- 64XxxxOxooO
- 66XxxxOoooO
- 68XxxoOoooO
- 70XxooOoooO
- 72XoxoOoooO
- 74OoxoOoooO
- 76XxxxOoxoO
Requires a synth allowing to play microtonal scales, as well as the tuning for that scale.
(Contributed by Bruce Kanzelmeyer)
7.18 Ionian, Dorian, and other modes
The remaining fingerings adapt the Whistle fingering to the following modes and scales: ionian, dorian, phrygian, lydian, mixolydian, aeolian, locrian, melodic minor, dorian b9, lydian augmented, lydian dominant, major minor, locrian 2, super locrian, minor harmonic, locrian 6, ionian #5, dorian #4, phrygian dominant, lydian #2, ultra locrian, major harmonic, dorian b5, phrygian b4, lydian diminished, harmonic minor, lydian augmented #9, locrian b13, harmonic major, double harmonic, hungarian minor, oriental, napolitan major, uniton sens., napolitan minor, and gypsy.
In addition, the left pinky key on the Sylphyo acts as a universal # (sharp) key, adding a semitone to any fingering, and the right pinky key acts as a universal b (flat) key, removing a semitone from any fingering.
8 Online support
8.1 Updates
Chances are that while you are reading this, a new version of the internal program of the Sylphyo is available. Thanks to updates, your Sylphyo will keep evolving for years.
We list all the available updates for the Sylphyo at www.aodyo.com/updates. Regularly check this page, or subscribe to its RSS feed, to stay informed of new updates.

Once in this page, click the link corresponding to your operating system, and follow the instructions specific to your system. Do not forget to connect your Sylphyo to your computer using the USB cable.

8.2 Troubleshooting and technical support
If an unexpected issue occurs with your Sylphyo, please read the frequently asked questions (FAQ) at www.aodyo.com/support. If this doesn’t help to solve the issue, shoot us a mail at support@aodyo.com and precisely describe your problem9. We’ll try to answer you as soon as possible.
8.3 User community
You might also want to exchange with other Sylphyo users. Feel free to join our forums at community.aodyo.com.
9 Complementary information
9.1 Technical features
9.1.1 Size and weight
- Sylphyo: 395 g (0.87 lbs)
- Link: 240 g (0.53 lbs)
9.1.2 Power and battery
Lasts up to 6 hours. Lithium-ion battery with a capacity of 2600 mAh. Charging via USB to a computer system or power adapter.
9.1.3 Maximum operating temperature
40 °C (104 °F).
9.2 Repairing the Sylphyo
Do not open the Sylphyo and do not attempt to service it yourself. Notably, the blue ring below the mouthpiece might be glued to the body in order to protect internal circuits from moisture in normal playing conditions, thus it should not be removed. More generally, damage to you or your instrument could occur during teardown. Please contact Aodyo or an authorized service provider.
9.3 Using the battery
Caution
Your Sylphyo contains a lithium-ion battery that can only be replaced by Aodyo or an authorized service provider. Do not try to replace the battery yourself, as this could cause overheating and injuries. The battery must be disposed of separately from household waste.
9.4 Cleaning
Although the internals of your Sylphyo are protected from condensation and moisture, it’s always good to do a little bit of cleaning after a good session.

First, make sure your Sylphyo is turned off and remove the mouthpiece. Then, take a soft swab, and gently pass it through the body. That’s it!
You can purchase a soft swab in our Sylphyo accessories pack.
9.5 Using the connectors and the switch
Avoid forcing a connector into a port, and do not use the switch with excessive force. If a connector does not fit into a port, first check that they match. The main screen of the Sylphyo turns on at most six seconds after power-on. If you suspect that the Sylphyo does not turn on normally, make sure you have been waiting for at least ten seconds before trying to turn it off and on again.
9.6 Using the mouthpiece
Do not try to play your Sylphyo without a mouthpiece.
The mouthpiece of your Sylphyo can be easily removed and replaced. You can order new mouthpieces at our usual resellers. After replacing the mouthpiece, please make sure that it is tightly and securely attached to the rest of the instrument.
9.7 Disposal and recycling
Your Sylphyo must be disposed of properly according to local laws and regulations. Because it contains electronic components and a battery, it must be disposed of separately from household waste.
9.8 Regulatory compliance information
This device complies with part 15 of the FCC Rules. Operation is subject to the following two conditions: (1) This device may not cause harmful interference, and (2) This device must accept any interference received, including interference that may cause undesired operation.
THE GRANTEE IS NOT RESPONSIBLE FOR ANY CHANGES OR MODIFICATIONS NOT EXPRESSLY APPROVED BY THE PARTY RESPONSIBLE FOR COMPLIANCE. SUCH MODIFICATIONS COULD VOID THE USER’S AUTHORITY TO OPERATE THE EQUIPMENT.
NOTE: This equipment has been tested and found to comply with the limits for a Class B digital device, pursuant to part 15 of the FCC Rules. These limits are designed to provide reasonable protection against harmful interference in a residential installation. This equipment generates uses and can radiate radio frequency energy and, if not installed and used in accordance with the instructions, may cause harmful interference to radio communications. However, there is no guarantee that interference will not occur in a particular installation. If this equipment does cause harmful interference to radio or television reception, which can be determined by turning the equipment off and on, the user is encouraged to try to correct the interference by one or more of the following measures:
- Reorient or relocate the receiving antenna.
- Increase the separation between the equipment and receiver.
- Connect the equipment into an outlet on a circuit different from that to which the receiver is connected.
- Consult the dealer or an experienced radio/TV technician for help.
FCC ID: 2ASYT-AODYOSYLPHYO
This device complies with Industry Canada licence-exempt RSS standard(s). Operation is subject to the following two conditions: (1) This device may not cause interference, and (2) This device must accept any interference, including interference that may cause undesired operation of the device.
Le présent appareil est conforme aux CNR d’Industrie Canada applicables aux appareils radio exempts de licence. L’exploitation est autorisée aux deux conditions suivantes : (1) l’appareil ne doit pas produire de brouillage, et (2) l’utilisateur de l’appareil doit accepter tout brouillage radioélectrique subi, même si le brouillage est susceptible d’en compromettre le fonctionnement.
IC ID: 24942-SYLPHYO
Equipment for use in locations where children likely to be present.
9.9 Trademarks
All the trademarks cited in this documentation are only used here for descriptive purposes. They remain subject to legal regulations and are owned by their respective property holders.
9.10 Disclaimer
This documentation represents the current state of the product, however it may evolve. We do everything we can to provide our users with high-quality products and documentation. However, Aodyo does not guarantee that this documentation exactly reflects the state of the product. Aodyo is not liable for data loss or damage resulting from the use of this product and/or its documentation.
Before August 2018, the Sylphyo was only a controller and could not produce any sound on its own, so you had to have a synthesizer or virtual instrument to use it.↩︎
Before August 2018, the Sylphyo did not include sounds and there wasn’t a Link wireless receiver. Instead, there was a small black wireless receiver that could be connect to a computer (via USB) or to a synthesizer (via MIDI) in order to receive a signal from the Sylphyo.↩︎
If you bought a Sylphyo before August 2018, you can purchase the sound upgrade to turn it into a Sylphyo+Link combo with sounds.↩︎
And sometimes your brush ends up running out of ink in the middle of a stroke, so don’t forget to breathe!↩︎
Sylphyo Bench supports Windows 7 and onwards, as well as macOS 10.8 and onwards.↩︎
Old timers will appreciate that the settings menu can also be accessed by pressing the Aodyo, the ↑ and the ↓ keys simultaneously, just like the first versions.↩︎
We recommend to use shake vibrato and key-bend to take full advantage of this sound.↩︎
We recommend to use shake vibrato and key-bend to take full advantage of this sound.↩︎
Don’t hesitate to include pictures, videos, or audio clips, if you feel they can allow us to diagnose the problem faster.↩︎
 No products in the cart.